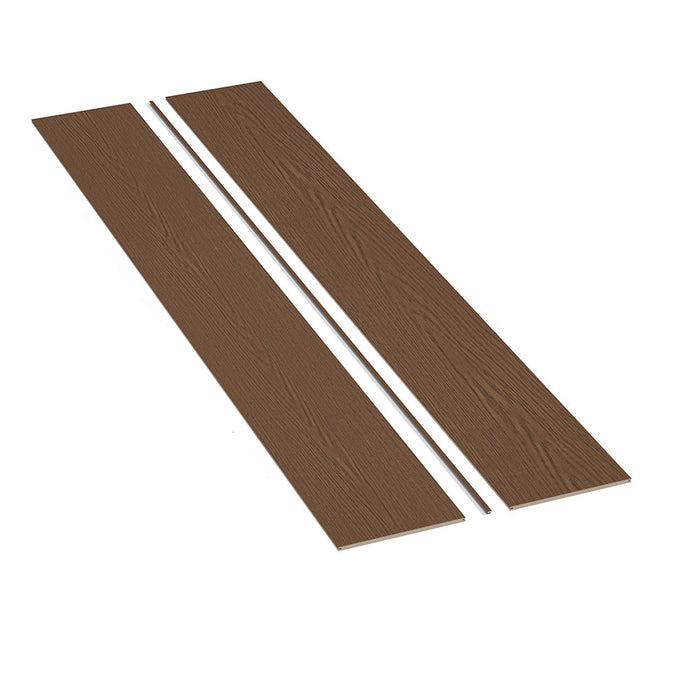
Chestnut Decorative Wall Panel Kit – Seamless Wood Panels with Trim for Interiors
Seamless MDF Panels. Rich Chestnut Finish. Complete Kit with Center Trim Included.
Upgrade any interior wall with the Chestnut Decorative Wall Panel Kit. Each kit includes two full-length seamless panels and a matching center trim connector, giving you everything needed for a clean, continuous installation right out of the box. The rich chestnut wood-grain finish brings warmth, depth, and natural character to any space — the look of real wood without the weight or cost of traditional millwork. The seamless panel design means no visible slat lines or gaps: just a smooth, uninterrupted surface with a precision tongue-and-groove edge that locks panels together flush for a built-in, professional result. Available in 94.5" and 106" lengths. Corner trim is available separately for a fully finished edge at corners and transitions.
Two panels per kit with center trim included. Corner trim sold separately. Glue-down installation. Interior use only.
Key Features
- Seamless panel design — no slat lines or gaps, smooth continuous surface
- Rich chestnut wood-grain finish — warm, natural depth ready to install
- MDF construction — stable, uniform, and easy to cut cleanly
- Kit includes 2 panels + matching center trim connector
- Corner trim available separately for fully finished edges
- Tongue-and-groove system — panels interlock flush for seamless alignment
- 13.8" wide x 0.47" thick panels
- Available in 94.5" length (~18.1 sq ft per kit) or 106" length (~20.3 sq ft per kit)
- Install on walls or ceilings with construction adhesive
- Cut to fit with a fine-tooth saw, circular saw, or jigsaw
- Interior use only
- Suitable for residential and commercial applications
- Ships from San Diego, CA
Why Chestnut
Chestnut is a warm, grounded finish — deep enough to make a statement, natural enough to blend with almost any interior palette. The wood-grain texture of the seamless surface adds visual depth that a painted wall cannot offer, and the continuous, uninterrupted panel face gives the wall a refined, tailored quality that slat-style panels do not. There are no gaps to collect dust, no visible fasteners, and no complexity at the panel-to-panel joint. Install straight from the kit: two panels, one trim piece, and a tube of adhesive is all it takes to cover a section of wall with a result that reads as custom rather than installed. Against warm neutrals, natural stone, or raw concrete, the Chestnut finish anchors the room with character and a sense of history. Against white walls and light furniture, it creates a rich, high-contrast focal point that draws the eye and defines the space.
- Living rooms and feature walls — warm, seamless backdrop with natural wood character
- Dining rooms — rich, textured surface that pairs with stone, metal, and natural materials
- Home offices — grounded, focused, and professionally finished
- Bedrooms — enveloping warmth without the weight of dark paint
- Hallways and entryways — welcoming first impression with architectural depth
- Commercial interiors — restaurants, hotels, retail, and office lobbies
Product Specifications
| Specification |
Details |
| Material |
MDF |
| Finish |
Chestnut wood-grain — pre-finished, ready to install |
| Panel Width |
13.8" (350mm) |
| Panel Thickness |
0.47" (12mm) |
| Profile |
Seamless (tongue-and-groove, no slat lines) |
| Application |
Interior only — walls and ceilings |
| Installation |
Construction adhesive (glue down) |
| Kit Contents |
2 panels + 1 center trim connector |
| Corner Trim |
Sold separately |
| Ships From |
San Diego, CA |
Kit Options
| Option |
94.5" Length |
106" Length |
| Panels per Kit |
2 panels |
2 panels |
| Coverage per Kit |
~18.1 sq ft |
~20.3 sq ft |
| Center Trim Included |
Yes |
Yes |
| Corner Trim |
Sold separately |
Sold separately |
| Minimum Order |
No minimum |
15 kits minimum |
Coverage Calculator
94.5" Length (~18.1 sq ft per kit)
| Area to Cover |
Kits Needed |
Notes |
| 50 sq ft |
~4 kits |
Add 10% for cuts and waste |
| 100 sq ft |
~7 kits |
Add 10% for cuts and waste |
| 200 sq ft |
~13 kits |
Add 10% for cuts and waste |
| 300 sq ft |
~19 kits |
Add 10% for cuts and waste |
106" Length (~20.3 sq ft per kit) — 15-kit minimum order
| Area to Cover |
Kits Needed |
Notes |
| 50 sq ft |
~3 kits |
Add 10% for cuts and waste |
| 100 sq ft |
~6 kits |
Add 10% for cuts and waste |
| 200 sq ft |
~11 kits |
Add 10% for cuts and waste |
| 300 sq ft |
~17 kits |
Add 10% for cuts and waste |
How to Install Chestnut Decorative Wall Panels
Installation is straightforward with construction adhesive and can be completed by most DIY homeowners in a few hours. These panels are for interior use only.
Step 1: Prepare the Wall Surface
The wall must be clean, dry, flat, and free of dust, grease, or loose material. Fill any holes or imperfections and let patched areas dry fully. For uneven walls, install a batten system or shim the surface flat before proceeding — the seamless tongue-and-groove system requires a flat substrate for a flush result.
Step 2: Measure and Plan Layout
Measure the wall area and calculate how many kits you need, adding 10% for cuts and waste. Plan your layout before applying adhesive: decide where the first panel starts, where seams will fall, and where corners and transitions will need trim. Order corner trim pieces before beginning for a fully finished result.
Step 3: Dry Fit
Before applying adhesive, place the panels against the wall to confirm layout, alignment, and where cuts will be needed around outlets, windows, and other features. The tongue-and-groove joint should engage smoothly and sit flush.
Step 4: Cut to Size
Cut panels using a fine-tooth circular saw, miter saw, or jigsaw. MDF cuts cleanly with a sharp blade — score the face side first to minimize chipping on the finished surface. Measure carefully before each cut.
Step 5: Apply Adhesive
Apply a high-quality construction adhesive such as Liquid Nails to the back of each panel in a zigzag or bead pattern, keeping adhesive away from the edges to prevent squeeze-out. Ensure even coverage for a strong, uniform bond.
Step 6: Install the First Panel
Press the first panel firmly against the wall, aligning it with a level reference line. Hold for several seconds until the adhesive grips. Check level before moving on — all subsequent panels align from the first one.
Step 7: Continue Panel by Panel
Slide each subsequent panel's tongue into the groove of the previous panel. Press firmly and check alignment as you work across the wall. The tongue-and-groove joint creates a tight, seamless connection with no visible gap at the seam.
Step 8: Install Trim
Use the included center trim connector where panels meet end-to-end along a continuous run. Install separately purchased corner trim pieces at inside and outside corners for a clean, fully finished edge. Apply adhesive to trim and press firmly into place.
Why YouShouldHaveIt
- Ships from San Diego, CA warehouse
- In-stock — same or next business day shipping
- Volume discounts automatically applied at checkout
- Expert team: (858) 261-4068, Mon–Fri 8am–4pm
- Retail showroom in Santee, CA — see the panels in person before you buy
Frequently Asked Questions
Q: What is the material?
A: These panels are made from MDF (medium-density fiberboard) with a pre-finished chestnut wood-grain surface. MDF is a stable, uniform material that cuts cleanly and holds its shape without warping under normal interior conditions.
Q: What does the Chestnut finish look like?
A: Chestnut is a warm, deep brown wood-grain finish — rich and natural-looking, with the texture and character of real wood. Order a 6" swatch sample to see it in your actual space under your lighting before committing to full kits.
Q: What is included in the kit?
A: Each kit includes 2 seamless panels and 1 matching center trim connector. Corner trim for inside and outside corners is sold separately — add it to your order when purchasing kits so everything arrives together.
Q: Is corner trim included?
A: No — corner trim is sold separately. It is available as a separate option on this page. We recommend ordering corner trim at the same time as your panel kits to ensure a complete, fully finished installation.
Q: What length should I choose?
A: The 94.5" length is available with no minimum order and covers ~18.1 sq ft per kit. The 106" length covers ~20.3 sq ft per kit but requires a minimum order of 15 kits — it is the best choice for large commercial or full-room installations.
Q: Can these be used on exterior walls?
A: No — these panels are rated for interior use only. MDF is sensitive to moisture and should not be used in exterior, wet-area, or high-humidity applications.
Q: How are these installed?
A: These panels are installed with construction adhesive (such as Liquid Nails) applied to the back of each panel. The tongue-and-groove system aligns each panel flush with the last. No nails or screws are required for wall installations; for ceilings, additional mechanical fasteners into framing are recommended.
Q: Can these be installed on ceilings?
A: Yes. For ceiling installations, supplement the adhesive with additional mechanical fasteners driven into solid framing to support the panel weight safely overhead.
Q: Do these panels help with sound?
A: These are decorative wall panels, not acoustic panels. The solid MDF surface reflects rather than absorbs sound. For dedicated acoustic performance, see our Acoustic Wall Panel collection.
Q: Can these be painted?
A: The pre-finished surface can be painted, but the wood-grain texture will still show through. For a flat painted result, prime the surface first. For painting over MDF edges and cut ends, seal with a primer before painting to prevent absorption and swelling.
Q: Is free shipping included?
A: Yes — free shipping within the contiguous United States.
Q: Do you have a showroom?
A: Yes — 10926 Woodside Ave Suite A, Santee, CA 92071. Monday–Friday, 8am–4pm.
Explore More Products
Discover more premium home improvement solutions designed for durability, style, and performance.